EDC Tip: Keychain Lighter
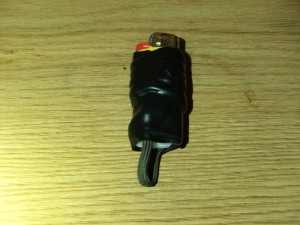
Today I have a DIY project for you. As part of my EDC key chain I carry a mini bic lighter. I find it more convenient to carry on my keys than to throw in my pocket. It helps to keep from forgetting to bring it. Since after a few years of use (not being a smoker) my bic finally died so I’ll show you step by step how to attach it to your keychain and why you might want to.

Why Carry a Lighter
I had a girl I work with ask me recently why I had a lighter on my keychain. Since I don’t smoke why would I need a lighter especially one on my Keys. There are a million reasons to carry a lighter. Number one being that it is the simplest way to create a fire. Sure ferro rods are cooler and won’t get damaged by water, and I carry on one my keys as well, but a lighter is fast and easy. I’ve used to light grills, camping stoves, candles and help out the occasional smoking damsel in distress whom did not have a working lighter. The weight to usefulness ratio is all in favor of carrying it. A mini bic weights next to nothing and if you’re not a snooker it will last a very very long time. I think mine lasted two years before it finally died out. So nw you know the why’s let’s get down to the hows.

Materials
To make them you can vary the material to your preferences and or what you happen to have. The basics of what you will need is: Lighter, Rope, Tape. Here is the speficic list I used to make the Keychain Bic this time:
- Mini Bic Lighter
- About a foot length of Paracord
- Black Electrical tape
- Superglue (optional but makes things easy)
I choose the materials to be the most effective from my testing. Bic brand lighters seem to last longer and are pess prone to breakage. In other fire making kits I usually choose off brand clear adjustable lights. It’s nice to see the fuel lever and be able to adjust the flame height. You could use much less cordage or a bit more. One Foot for the mini bic is a good length though. It’s enough to leave a loop on the end and wrap from top to bottom. Also it gives you an extra foot of cordage on you at all times. The black electrical tape is skinnier and easier to use to wrap around the lighter. You could give it a few extra wraps around so you could use some of the extra tape. The superglue makes the wrapping easier. The first time I made one I omitted the glue using it makes things faster.

Gluing on the Paracord
This first thing I do is make a knot in one end of the rope. Glue this end near the top of the lighter. Then run the paracord down and make a loop at the bottom . I use a finger on the bottom to loop around and then go up the back side. Glue the paracord on the backside even with the spot you glued it on the front. Give it a minute or so to dry then move on to the next step.

Wrap the Lighter
No need to get fancy with the wrapping here. I just wrap from the top to the bottom and tuck the last bit under the loop to keep it in place. You could superglue this last piece as well I chose to leave it loose to make it easier to unwrap if I needed to.

Tape it
The last step is to wrap the whole thing with tape. Nothing special here just wrap it around. I start at the top and work down wrapping it tight as I go. You could make a few passes to build up layers if so desired to give yourself more tape in case you need it.
There you have it you have a lighter with a loop on it to attach to a key ring. Using a locking link like I do you can easily remove this if you need to separate from the rest of the keychain. Now you have no excuse to be caught without an EDC lighter and If I ever met any of you in the real world expect an EDC check from me.
How do you carry a lighter? Do you choose not to? Let me know in the comments!
Today’s article brought to you by the great folks over at Survivalgearbags.com home to all your Bug out bag and tactical needs.


Comments are closed.